Visceral Osteopathy
Week one
Valeria and Enda introduced the class back into the theories and aims of visceral osteopathy with a brief powerpoint. I was particularly interested in their views as my dissertation project is based on the use of visceral manipulation in the BSO clinic. Today was focused on the diaphragm and it's main functions in inspiration, massage affects on the inferior direct organs and aiding the vena cava for efficient venous return. We started with assessment of our colleagues diaphragms, using broad hand applicators over both costal margins and 'priming' the ribcage by gently compressing against skin and fascia. Patients were asked to breathe in and out through their nose to ensure greater rib expansion, and this allowed us to assess if one side was rising more than the other side or if one didn't depress as much as the other. If we did feel a difference, we then had to ask ourselves if the restricted side was restricted laterally or medially to the sternum.
Once we had practiced this on several different colleagues, we moved on to two diaphragm techniques. The first was with the patient laying on their 'restricted' side and involved using the pelvis as a traction lever. The other was a seated technique, in which the practitioner stands posterior to the patient and brings their arms around the patient to either fix onto the fascia covering the costal margin or to roll the skin to stretch the fascia directly. The patient is asked to slump forwards whilst breathing in, then arch back and look at the ceiling whilst breathing out. Whilst the patient does this, the practitioner is able to gather more fascia to create a larger stretch if needed. I really enjoyed today's class, as I fully admit to not using many diaphragm techniques in clinic as some techniques can be uncomfortable. However, I feel this are much more patient friendly and shall be trying this with patients who may have yellow or blue flags affecting their health, or who have respiratory conditions or recent common colds.
Once we had practiced this on several different colleagues, we moved on to two diaphragm techniques. The first was with the patient laying on their 'restricted' side and involved using the pelvis as a traction lever. The other was a seated technique, in which the practitioner stands posterior to the patient and brings their arms around the patient to either fix onto the fascia covering the costal margin or to roll the skin to stretch the fascia directly. The patient is asked to slump forwards whilst breathing in, then arch back and look at the ceiling whilst breathing out. Whilst the patient does this, the practitioner is able to gather more fascia to create a larger stretch if needed. I really enjoyed today's class, as I fully admit to not using many diaphragm techniques in clinic as some techniques can be uncomfortable. However, I feel this are much more patient friendly and shall be trying this with patients who may have yellow or blue flags affecting their health, or who have respiratory conditions or recent common colds.
Week two
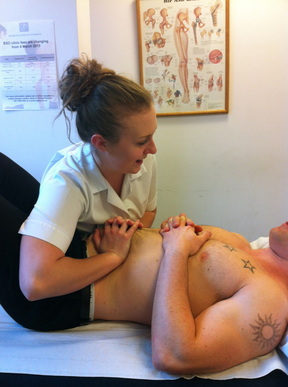
The beginning of today's class focused on revisiting the diaphragm techniques we learnt last week, this time working on different colleagues and getting lots of tutor feedback and supervision. We then went on to speak about the crura of the diaphragm, with the left crura attaching at L1-L2 and the right onto L1-L3. As we cannot access the crura, due to it's anterior positioning onto the lumbar vertebrae, we were shown a seated technique to influence it through the close relationship with the psoas major and quadratus lumborum. Practitioners stand posterior to the patient and palpate the 12th rib and travel laterally until they find a space the size of a 20p piece (or thumb pad size). We then applied our thumb to this space and side-bent the patient away from the affected side to gain better access and then towards to allow greater slack and a deeper insertion. Once a position of ease or tension release is felt, the patient can return to neutral. As a patient I found this technique fantastic, it left me feeling looser and a warming sensation around the 'space'.
We finished the lesson by looking at the anterior thorax as a whole, and how we would assess the S/C, A/C and G/H to gain a general picture of how the thorax is functioning during respiration and gliding motions. I will be trying to set myself a target of including these assessments within my general assessments in clinic to gauge an idea of how the thorax and it's fascia are working together.
We finished the lesson by looking at the anterior thorax as a whole, and how we would assess the S/C, A/C and G/H to gain a general picture of how the thorax is functioning during respiration and gliding motions. I will be trying to set myself a target of including these assessments within my general assessments in clinic to gauge an idea of how the thorax and it's fascia are working together.
Week three
Today we began with re-capping last weeks seated techniques and assessment of the shoulder complex. We were then shown a sidelying technique to treat subclavius and the superficial fascia surrounding it. The patient lays on their symptomatic side as this pushes the AC and SC medially. The practitioner's thumb is positioned on the inferior surface of the patient's clavicle (subclavius origin and insertion), with their fingers resting superiorly over the patients shoulder. We then added compression, flexion and adduction via the humerus, in attempt to find a position of ease. Once found, we held the position for 20 seconds and repeated 2-3 times if necessary. re-assess. Once I had done this technique on my partner, she reported a reduced tenderness and a general improved range of movement at the shoulder complex.
Week four
This week, we learnt techniques that focus on the suspensory ligament/ fascia of the dome of the lung. To do this, the practitioner places their thumb between the patient's SCM and inferior scalenes. We then added traction of cervical spine, with flexion and rotation towards the thumb application. With the patients respiration pattern, the practitioner sidebends and rotates the patient's head away from the applicated thumb. Another technique shown was a sternum release. The practitioner places both of their thenar borders on the patient's sternum. We then compress the hands medially to take up tissue slack.With the patients expiration, compression should be applied until an end point/ tension point feels like it has been reached after 2-3 breaths. As the patient starts to inhale on the 3rd or 4th inhale, the practitioner quickly releases the compression, causing the patient to take a sharp intake of breath. I had been shown this technique before when I had experienced a cold and really love the instant feeling of being free around the thoracic cavity. I have also used it on patients recently who are suffering with common colds during the winter months and it appears to pleasantly suprise patients!
Week five
Today was a really fun lesson because Valeria brought washable felt tips to be able to draw junctional zones within the abdominal cavity:
These areas were surprisingly different in quality/palpation and felt tender on most students, which is common as they are highly active zones constantly used within the digestive cycle.
Going over these areas with pen helped to visualise internal anatomy by using certain landmarks to gain their location. As I learn through visual aids, it really helped to bring anatomy in a textbook to life on a real patient!
- The cardiac sphincter (stops reflux of food up oesophagus) is located medial and inferior to left of xiphoid process
- Pyloric sphincter (passage for stomach contents into duodenum) is located superior to patients navel (4 finger width)
- Sphincter of Oddi (controls bile and pancreatic juice flow into duodenum) is located level to navel in the mid-clavicular line
- Duodenojejunal junction (DJ) is located left of the patient's navel in the mid-clavicular line.
- Ilio-caecal valve (controls small intestine content movement to the caecum) is half way between the patient's navel and anterior superior iliac spine.
These areas were surprisingly different in quality/palpation and felt tender on most students, which is common as they are highly active zones constantly used within the digestive cycle.
Going over these areas with pen helped to visualise internal anatomy by using certain landmarks to gain their location. As I learn through visual aids, it really helped to bring anatomy in a textbook to life on a real patient!
Week six
This week we continued with abdominal junctional zones but this time focusing on the treatment on dysfunctional areas. Treatment involved location of the junctional areas and putting practitioner finger pads on the zone and rotating it clockwise and anticlockwise to see which direction it liked to go. Valeria explained that junctions that favour anticlockwise motions are 'normal' as this is the direction of flow from one junction to another, however clockwise motions are a sign of dysfunction and need to be treated by encouraging movement in the opposite direction 3-4 times and then reassessing. When working with Andrea, we both strangely found that one or two areas were positioned clockwise and were tender, yet were not post treatment! I will definitely be using this for a patient who has a history of
Week seven
Lesson cancelled due to tutor sickness.
Week eightToday we looked at techniques from previous lessons and then drew our attention to the stomach,which varies in positioning and size from patient to patient yet surprisingly lies more inferior than I initially thought. After locating and palpating each others stomach to find out individual location, we were shown techniques to encourage motility using supine techniques. Practitioners interlace one hand on top of the other to be able to pull the stomach medially and then push it laterally using the heel of their hands. By doing this softly and slowly, it felt very therapuetic, not too invasive and really felt like you were massaging the stomach directly, as pictured on the right!
|

|
Week nine
Today we examined the liver, which extends from the 5th intercostal space superiorly, the costal margin inferiorly, the lesser omentum to stomach medially and kidneys and duodenum laterally. Examination may be deemed necessary if patient is experiencing external signs as well as nervous exhaustion, headaches, low mood and general malaise. We were shown how to examine the liver with the patient side-lying on their left to have greater access to the liver. The practitioner cups the right costal margin to determine if the liver is positioned in a particular direction and if it moves when encouraged to do so. If the liver moves superiorly and laterally then it is externally rotated and if it moves inferiorly and medially, it is medially rotated. On our patients, we then found which direction the liver like to go and held it there with repetitions. I found this technique hard as I wasn't sure if I was feeling costal margin movement rather than the liver underneath, however only practice will be able to further my palpatory skills to differentiate.
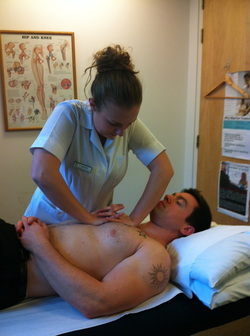
Week tenThe lesson started off with a dissection video paying particular attention to the small intestine which can be observed as a bouquet bunch and resembles a brain with its many folds in different directions! The techniques demonstrated aimed to 'gather' the small intestine bouquet between practitioner hands to draw them superiorly in order to achieve space and motility. The first technique show was supine with the patient's knees bent to take off abdominal stretch. The practitioner placed their hands either side of the lateral abdomen and brought their hands closer to 'pick up' the abdomen. Using patient respiration, each hold created a stretch until the desired change was made. This technique can also be done with the patient on all fours, which allows the intestines to fall with gravity - however a good relationship between patient and practitioner is needed for both parties to feel comfortable! The same principle can also be applied side lying although this is harder to gain access to the patients side that they are laying on.
I really loved these techniques as it felt like no other technique we had been shown. It required little effort to achieve a great response and feeling of space and release from a patients perspective! |
Small Intestine bouquet technique.
|
Week eleven
For our final lesson, we were introduced to techniques focusing on the kidneys techniques today, starting off by recapping anatomy using dissection videos. We learnt a modified lumbar roll technique using a thumb applicator lateral to the quadratus lumborum over where the kidneys are positioned. We used levers of rotation with the upper body and side bending by asking the patient to straighten out their leg and performed 3 or 4 times until the tension eased off and the quality of tissue became softer. We then moved on to a supine technique, placing one hand under the patient's 12th rib and the others on the patient's abdomen with the ulnar border between the duodenum and ascending colon. We then attempted to feel of the kidney between the two hands in different directions of movement, however I found this very difficult as the applicator was broad and there are lots of other structures being contacted!
We finished today looking at reproductive organ dissection, particularly in female patients with the pubic symphasis, bladder and uterus with ovaries. We attempted to palpate the tension of the sacrum as pain is referred here with gynaecological dyfunction and relation of sacrum to bladder/uterus positioning. I am disappointed that visceral elective is finishing as I was starting to feel that my palpation was really improving and I was beginning to embrace the concept of less is more! However from this taster course, I now feel I have some techniques in my tool box to be able to assess and treat patients with visceral dysfunction.
We finished today looking at reproductive organ dissection, particularly in female patients with the pubic symphasis, bladder and uterus with ovaries. We attempted to palpate the tension of the sacrum as pain is referred here with gynaecological dyfunction and relation of sacrum to bladder/uterus positioning. I am disappointed that visceral elective is finishing as I was starting to feel that my palpation was really improving and I was beginning to embrace the concept of less is more! However from this taster course, I now feel I have some techniques in my tool box to be able to assess and treat patients with visceral dysfunction.
|
Visceral small intestine lift technique performed on 45 year old male patient with IBS symptoms
Sternal/thoracic respiratory release technique
|
